Company Store
This SharePoint Add-in creates an instant online store with shopping cart to manage all of your company-branded merchandise.
Bulletproof Apps are no longer available for download in the Microsoft AppSource store and will be retired permanently on December 1, 2022.
Please contact Bulletproof for custom app development
services using Microsoft 365 and Microsoft Azure.
Click on any category or help topic to expand.
How do I add the app to my SharePoint site?
After downloading the Company Store from Microsoft AppSource, you can add the app to a site just like any other list or library. Follow these steps:
Before you add the Company Store to your SharePoint site, consider the following:
- We recommend that you create a new site or site collection for the Company Store.
- During the deployment process, many lists will be created on your site. You may want to apply unique permissions to each list using your own SharePoint security groups.
- The deployment process requires that Site Columns and Content Types be created at the Site Collection level. You must have the appropriate permissions.
- A Company Store Web Part can be added to web pages, but only on the site where the app is installed.
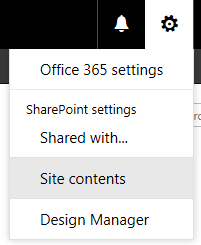
Open the gear menu, and select Site Contents.
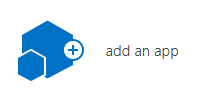
In the Classic Experience, click add an app.
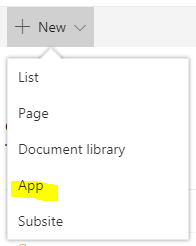
In the New Experience (the Modern UI), select New > App.
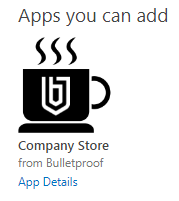
Click the icon for Company Store.
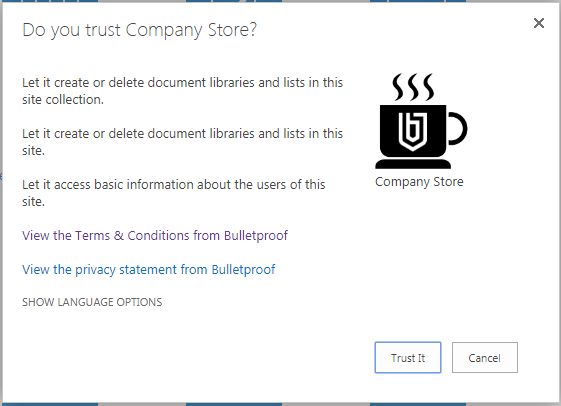
If this is the first time you are adding the app to your site, you'll need to grant permissions. Click Trust it. The following permissions are required:
- Site Collection. Site Columns and Content Types are created at the root website of your site collection. In addition to being SharePoint best practice, it allows the app to be installed on multiple sites.
- Site. Lists are created on the current site to store data for the app. Your data is stored on your site, not with Bulletproof.
- Users. The app needs to know information about the current user such as display name and email address.
Information about data and privacy can be found at https://bulletproofapps.azurewebsites.net/Home/Privacy.
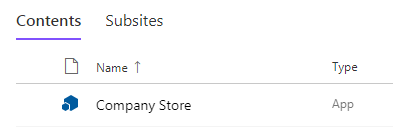
When the installation is completed, you should see Company Store listed in your Site Contents.
What permissions should I apply to the new lists?
You must apply permissions to the lists before users can use the Company Store. You can use the built-in permission levels that come with SharePoint, or create your own custom levels. Follow these guidelines:
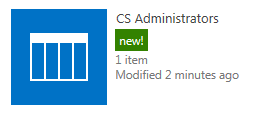
The CS Administrators list contains a list of all users who are administrators of the Company Store app. Administrators can see all of the administrative pages and menu items, including the Process Orders page. Regular users can only see the Company Store page.
- Regular users should only have read-only permissions to this list. The built-in SharePoint Visitors group with Read permission level can be used.
- Administrators should be able to edit this list. The built-in SharePoint Members or Owners groups with Edit or Full Control permission levels can be used.
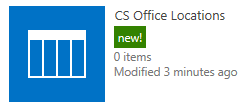
The CS Office Locations list contains office location(s) and the default tax rate applied to products.
- Regular users should only have read-only permissions to this list. The built-in SharePoint Visitors group with Read permission level can be used.
- Administrators should be able to edit this list. The built-in SharePoint Members or Owners groups with Edit or Full Control permission levels can be used.
The CS Order History list contains all line items for orders that have been processed.
- Regular users should only have read-only permissions to this list. The built-in SharePoint Visitors group with Read permission level can be used.
- Administrators should be able to edit this list. The built-in SharePoint Members or Owners groups with Edit or Full Control permission levels can be used.
The CS Orders list contains all pending orders and all orders which have been processed.
- Regular users must be able to add new items to this list, because the Company Store inherits the current user's permission level to submit new orders. The built-in SharePoint Members group with Edit permission level can be used; however, regular users do not require edit or delete permissions. We recommend creating a custom permission level that only allows users to add new items to a list.
- Administrators should be able to edit this list. The built-in SharePoint Members or Owners groups with Edit or Full Control permission levels can be used.
The CS Payments list contains all completed payment information.
- Regular users should only have read-only permissions to this list. The built-in SharePoint Visitors group with Read permission level can be used.
- Administrators should be able to edit this list. The built-in SharePoint Members or Owners groups with Edit or Full Control permission levels can be used.
The CS Product Images library contains all photos/images of products.
- Regular users should only have read-only permissions to this list. The built-in SharePoint Visitors group with Read permission level can be used.
- Administrators should be able to edit this list. The built-in SharePoint Members or Owners groups with Edit or Full Control permission levels can be used.
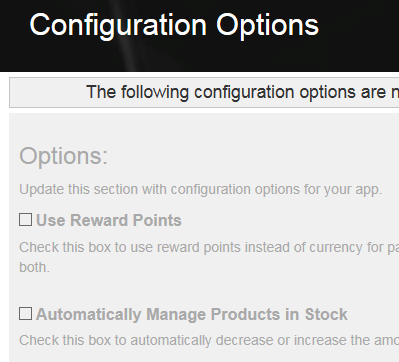
The CS Products In Stock list contains all product sizes and quantity in stock.
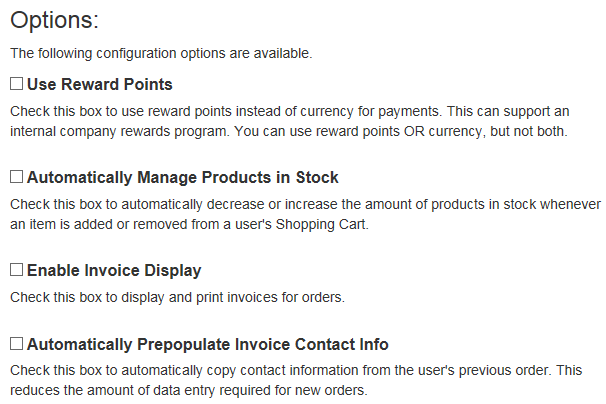
- When the configuration option Automatically Manage Products in Stock is enabled (paid subscriptions only), the quantity of products is automatically decreased/increased when users add/remove items from their shopping cart.
- Regular users must be able to edit items in this list, because the Company Store inherits the current user's permission level. The built-in SharePoint Members group with Edit permission level can be used; however, regular users do not require add or delete permissions. We recommend creating a custom permission level that only allows users to edit items in a list (no ability to add or delete items).
- Administrators should be able to edit this list. The built-in SharePoint Members or Owners groups with Edit or Full Control permission levels can be used.
The CS Products list contains all individual product information.
- Regular users should only have read-only permissions to this list. The built-in SharePoint Visitors group with Read permission level can be used.
- Administrators should be able to edit this list. The built-in SharePoint Members or Owners groups with Edit or Full Control permission levels can be used.
The CS Shopping Cart list is a temporary storage location where all users' shopping cart items are saved.
- Regular users must be able to add, edit, and delete items from this list, because the Company Store inherits the current user's permission level to save shopping cart items. The built-in SharePoint Members group with Edit permission level can be used.
- Administrators should be able to edit this list. The built-in SharePoint Members or Owners groups with Edit or Full Control permission levels can be used.
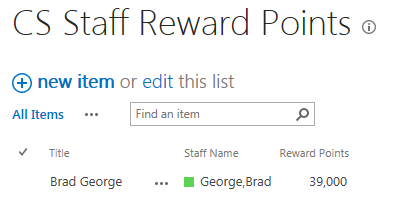
The CS Staff Reward Points list contains a list of staff members and their total accumulated reward points (paid subscriptions only).
- Regular users should only have read-only permissions to this list. The built-in SharePoint Visitors group with Read permission level can be used.
- Administrators should be able to edit this list. The built-in SharePoint Members or Owners groups with Edit or Full Control permission levels can be used.
Why does the app redirect me to "azurewebsites.net"?
Bulletproof Apps for SharePoint use the SharePoint Provider Hosted Add-In Framework. This means that Bulletproof hosts a website in Microsoft Azure cloud services that contains all of the app's web pages and web parts. Every website in Microsoft Azure is assigned a web address like "myapp.azurewebsites.net". When you click on the app in your SharePoint site, you get redirected to this site. All apps are secure and authenticated by your SharePoint site.
No step-by-step instructions for this topic.
Company Store - User Guide
How do I browse or search for products?
The Company Store page gives you the ability to browse products, filter by category, and search by product name/description. Here is an overview of your options:
Open the gear menu, and click Site Contents.
Click the Company Store app.
Most users will be taken directly to the Company Store page. If you are an administrator, click Company Store in the top navigation.
To browse all products, simply scroll down the page. Details for each product are displayed in separate panels.
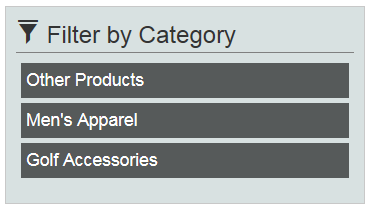
Click on any category name in the Filter by Category panel to see only products tagged with a specific category.
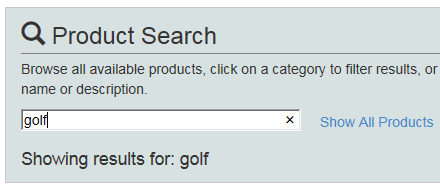
Use the Product Search panel to search by product name or description. As you type in the Quick Search box, the product list will be instantly filtered by your search terms.
Click Show All Products at any time to view the complete list of products.
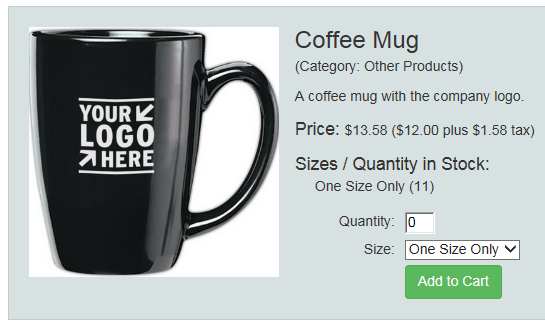
How do I add items to (or remove items from) my shopping cart?
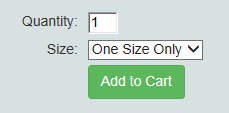
Simply browse to the product, enter the desired quantity, select a size (if applicable), and click Add to Cart. Follow these steps:
When you find the product you'd like to order:
- Enter the desired Quantity
- Select a Size (if applicable)
- Click Add to Cart
The item(s) will be placed in your shopping cart. To remove the item(s) from your cart, simply click the trash can icon.
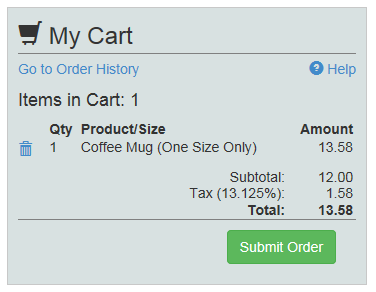
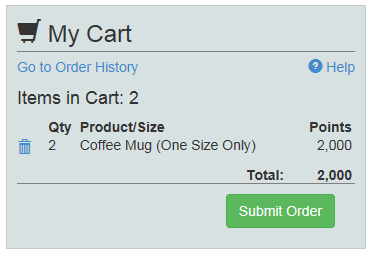
How do I submit my order?
Once you have all desired items in your shopping cart, click the Submit Order button. Here's a screenshot:
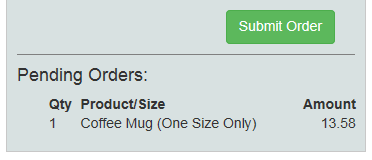
Your pending order(s) will be visible in the My Cart panel until they are processed by the store administrator.
Company Store - Administration
How do I use the Company Store as an internal company rewards program?
(Paid subscriptions only) The option Use Reward Points on the Configuration Options page will transform the store into a company rewards program. Here's how it works:
Check the Use Reward Points box on the Configuration Options page. Click Save.
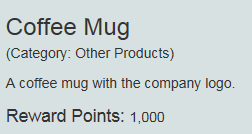
All products in the Company Store will show how much they cost in Reward Points.
Total reward points will be displayed in the Shopping Cart.
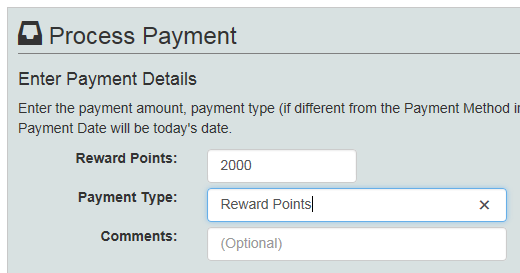
Payments on the Process Order page will be saved using Reward Points.
Reward points will be automatically deducted from the staff person in the CS Staff Reward Points list.
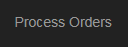
How do I process new orders and record payments?
The Process Orders page is where store administrators can view orders and record payments. Follow these steps:
In the top navigation menu, click Process Orders.
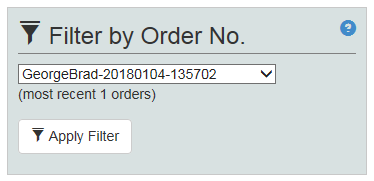
In the Filter by Order No. panel, select an order and click Apply Filter.
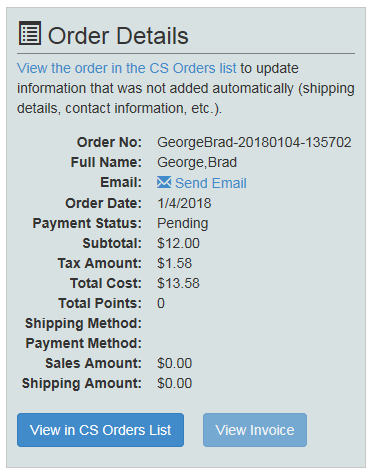
Some order information is displayed in the Order Details panel.
- Click Send Email to open a new email message addressed to the staff person who submitted the order.
- Click View in CS Orders List to manually enter or update order information (shipping information, invoice comments, staff address and contact information, etc.)
- Click View Invoice to view or print an invoice (paid subscriptions only)
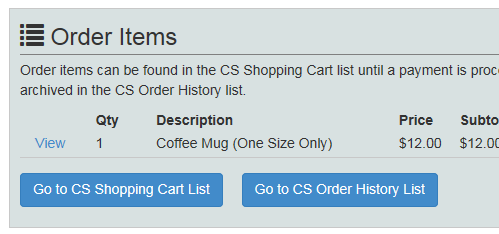
Review the individual line items from the shopping cart in the Order Items panel. Links to the CS Shopping Cart list and CS Order History list are provided for your convenience.
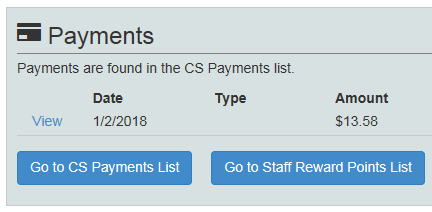
Review existing payments in the Payments panel. Links to the CS Payments list and the CS Staff Reward Points list are provided for your convenience.
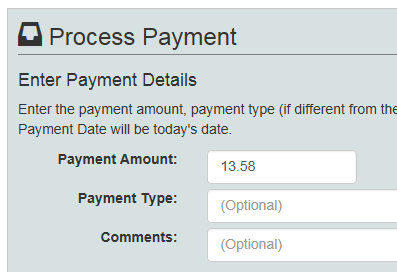
Enter new payment details in the Process Payment panel.
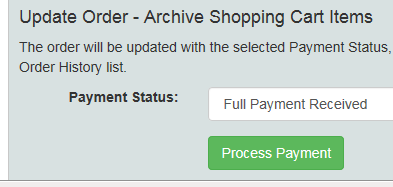
Select a Payment Status. Click Process Payment to:
- Add new payment information to the CS Payments list.
- Update the Payment Status for the order in the CS Orders list.
- Archive the shopping cart item(s) in the CS Order History list.
How do I delete an item from an order or cancel an entire order?
Removing a single line item from an order can be done with a single click. Cancelling an entire order requires a few extra steps. Follow these steps:
Individual items can be deleted by clicking the trash can icon in the Order Items panel. When you delete item(s) from an order using the Process Orders page, the quantity will be increased in the CS Products In Stock list (paid subscriptions only).
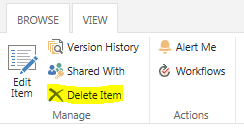
To delete the order itself, click the View in CS Orders List button in the Order Details panel.
Click Delete Item in the ribbon.
Can I use my own SharePoint page for the Company Store?
Yes, the store interface is available as a web part which can be added to any SharePoint page on the same site where the app is installed. Follow these steps:
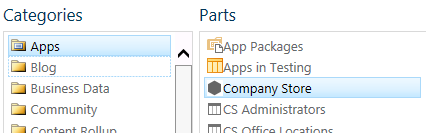
If your web page uses the New Experience (Modern UI), click Edit.
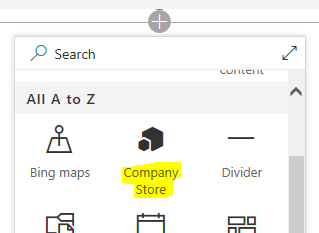
Click the Plus (+) icon to add a web part, and click Company Store.
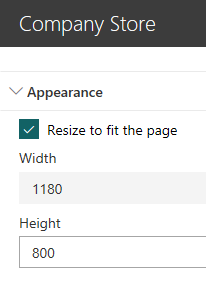
Depending on the type of page, you may need to resize the web part. If so, click the pencil icon.
Make one or more changes as needed.
- Check Resize to fit page if you want the store to look good on mobile devices.
- Increase the Height to be taller than the height of all products. Otherwise you'll see scroll bars.
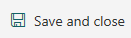
Click Save and close (or click Publish).
If your page uses the Classic Experience, follow these steps. These screenshots were taken using a Web Part Page. Click Edit Page.
Click Add a Web Part in a zone that spans the entire page.
Select Company Store, and click Add.
You will probably need to edit the height and width to eliminate scrolling issues. Update these settings in the web part properties.
- Height. Set to taller than the height of all products to eliminate scrollbars and hidden scrolling issues.
- Width. Set to at least 1200 pixels.
Click Apply to save new web part properties.
Click Stop Editing to save the page.
Why is "Invalid Image Link" displayed for some products?
If you see Invalid Image Link displayed, please ensure that the image has been uploaded to the CS Product Images library and the Product Image link in the CS Products list is a direct link to the image (not a temporary "secure" link generated by the Copy Link button). For best results, all product images should be uploaded to the site where the Company Store is installed. Otherwise, your web browser may consider an external image to be a potential "cross site scripting" security issue.
No step-by-step instructions for this topic.
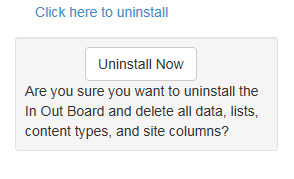
How do I uninstall the app from my site?
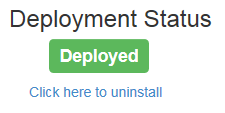
You can uninstall the app from the Deployment Options page. Follow these steps:
On the Deployment Options page, select Click here to uninstall.
Click Uninstall Now to confirm.
- All lists used by the Company Store app will be deleted from the current site, including all data. Lists are deleted permanently, they will not appear in your Recycle Bin.
- All Site Columns and Content Types will be deleted from the site collection. However, if the Company Store is installed on any other sites, the Site Columns and Content Types cannot be deleted until the last app is uninstalled.
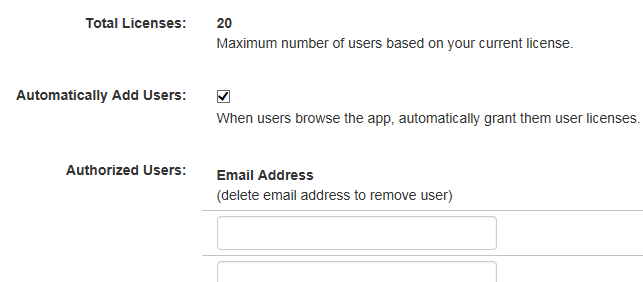
How do I manage user licenses?
User licenses for Bulletproof Apps are managed on the Configuration Options administration page. Here are some guidelines for managing licenses:
In the top navigation menu for your app, click Configure.
Scroll down to the User Management section.
If your Total Licenses shows Unlimited, then your app can be used by an unlimited number of users. No user management is required. Please note that depending on the app, there may be restrictions on the number of users allowed per site.
Otherwise, Total Licenses will show the maximum number of user licenses available, and additional options will be visible.
- Total Licenses. The maximum number of users who can use the app.
- Automatically Add Users. When this box is checked, users will be automatically granted a license and added to the Authorized Users list.
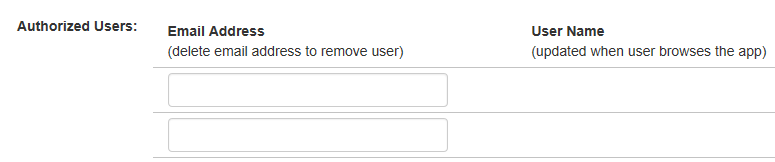
- Authorized Users. The list of users who are authorized to use the app.
To manually add a new Authorized User, enter their email address in one of the textboxes and click Save.
- At first, just the email address will be visible on the Configuration Options page.
- When the user first browses the app, their SharePoint display name will be added to the page.
- If you have a license level with hundreds of users, this list could be very long. Use your browser's "Find on Page" functionality to search for individual user names (on Microsoft Windows web browsers, this can usually be found by pressing Ctrl-f).
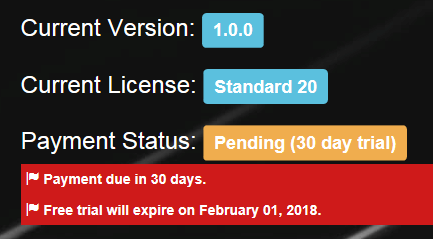
Is a free trial available?
Yes. The Free License comes with limited functionality for five (5) users. A 30-day free trial can be activated to see all functionality included in paid subscriptions. Follow these steps to activate a free trial.
All Configuration Options are disabled when using the free version.
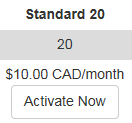
To activate a 30-day free trial, click Upgrade in the top navigation menu.
Click Activate Now on any subscription level to instantly activate a free trial.
The Current License and Payment Status will be updated, and the free trial will expire in 30 days.
Click Configure in the top navigation menu.
The Configuration Options are now available. There are dedicated help topics for each option in the Company Store - Administration section of the online help.
How do I submit a request to Bulletproof Support?
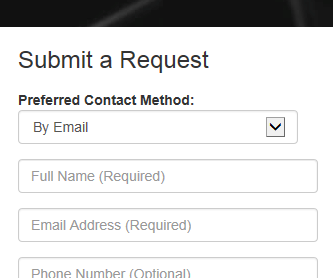
The app administrator can submit a request by filling out the form on the Online Help page. Follow these steps:
Go to your SharePoint site where the app is installed and click on the app. Then click Get Help in the navigation menu.
Under the heading Submit a Request, fill out the form and click Save. A member of the Bulletproof support team will contact you.
Does Bulletproof offer additional SharePoint support?
Yes, Bulletproof has a team of SharePoint Support staff and offers support contracts as a Managed Service. Bulletproof also has a team of SharePoint Consultants in the Professional Services division who can assist you with planning, architecture, custom development, and general consulting. Go to https://www.bulletproofsi.com for more information.
No step-by-step instructions for this topic.
Does Bulletproof make any other apps?
No step-by-step instructions for this topic.